Dec 5, 2014

Gopur Variation, one more Kutch Work Pattern


          Hi, here comes one more kutch work pattern, its a variation of " Gopur Kutch Pattern ". Quite big motif, looks complex at first sight, but serious its very simple and covers large area. You can the pattern here " Gopur Variation Kutch Pattern ".

           
           Below picture shows first step of foundation stitch. Observe small squares (yet to be worked ), these 26 squares are worked in next step of foundation stitch. 


Gopur Kutch Variation foundation stitch, Step 1

                    Second part of foundation stitch .


Gopur Kutch, foundation stitch, step 2
       
                      Same way filling ( interlacing foundation stitch ) worked in two steps. Below picture shows first step.

Gopur Kutch , filling part 1

                   Here comes finished " Gopur Kutch Pattern ", again each 26 squares has to be interlaced individually for second step of filling.


Gopur Kutch Pattern

               Hope you all enjoy working this pattern also. For any queries do leave a word. Happy Stitching !!!

Dec 2, 2014

Kutch Work Pattern


          Hi, here comes two more Kutch work patterns, again its inspired by " Karnatak Kasuthi " patterns, its called kutch square and border. Hope you all enjoy these patterns too. You can get these patterns Kutch Square and Kutch Border.


Kutch Square

 Kutch Border
                Happy Stitching !!!!!!

Nov 28, 2014

Gota Patti ( Lappe ka kaam )

                  Gota Patti work also known as " Lappe Ka Kaam ", the most famous work of  "Rajasthan" and origin of this craft. Gotapatti traditionally worked on temple idols, cloths on offering prayer, on royal outfits ( Mughal Era ). These outfits especially worn on auspicious days, weddings.


                  Earlier these Gota ( ribbons ) were made with pure gold and sliver, now a substitute Gota ribbons woven on power loom with cotton (warp) and metal (weft) threads. These Gota are cut into different shapes like circle, leaf ( sometimes small ribbons directly hemmed to enhance borders ) to create a pattern. Gota's  are also folded into shapes like rhomboid to create a border.


                 Gota are first stuck with fabric glue on fabric and then  appliqued using couching, back stitch, chain stitch, hem or running stitch. Gota  has tape at its backside for stiffness and also holds ribbon threads from fraying after cutting into shapes.


Gold and silver Gota in circle shape ( tape on backside of gota, center circle ), Gold zari thread for couching


Gota with heart shape stuch on fabric with fabric glue

Gota couched with Zari thread

Silver gota leaf

Finished Gota work


Oct 15, 2014

GBCW...... Final touch

                   
              Hurray its final post on GBCW,  earlier we did butterfly 1 & 2tulipgrapes and creeper. Lets add some final touch to complete this project.

                Now for upper part of grapes ( half circle ), work ' Bullion knots' with 3 strands of thread, shade no 267.  And for stem of grapes, work two line of  ' chain stitch ' with 2 strands of thread, shade no 262.

Grapes

                      For tiny creepers on big creeper work ' Stem stitch ' with 3 strands of thread, shade no 267.


Creeper
                 
                  Work ' French knots ' around tiny creepers with single strand and two warps, shade no 307.


Creeper
                   
                   Work ' French knots ' for the circle on grapes leaf with 2 strands of thread, shade no 269.


Grapes
       
            Vow, we are done !!!!!  Are you ready to have a glance .......... Here you go...........


Grapes & Butterfly Crewel Work
           
                 
                     This project is intermediate, not too tough. That doesn't mean beginners can't try !!!!, even you can try once you learn all stitches worked in this project. Have a look, stitches used for this project,

                   1. Closed Buttonhole stitch.
                   2. Stem stitch.
                   3. Chain stitch.
                   4. French knots.
                   5. Trellis or Jacobean couching.
                   6. Triangle filling.
                   7. Satin stitch.
                   8. Raised stem stitch.
                   9. Fly stitch.
                 10. Laid work.
                 11. Bullion knots.
                 12. Herringbone.
                 13. Ribbed spider web.
                 14. Detached chain / laisy daisy.

Grapes & Butterfly Crewel Work 


                     List of thread, shade numbers ( Anchor threads )

         Greens :
             
                       246, 256, 262, 267, 269, 281, 393, 889.

         Brown:

                    355, 357, 358, 380.

         Blue:

                   170, 189, 1089.

         Orange:

                   304, 307, 326.

         Grey:

                   401.

          Peach:

                     10, 329.

           Purple:

                       871, 873.


Grapes & Butterfly Crewel Work

Grapes & Butterfly Crewel Work
           
                Hope you all enjoyed this project. Do leave a word, for any doubts and please do share your work. Happy Stitching.


Oct 13, 2014

GBCW..... Creeper


               We have almost reached finishing point, earlier we worked Butterfly 1 and 2,  Tulip,  Grapes. We shall move on work ' Creeper '.

                  Whole creeper is worked with ' chain stitch '.  Start working chain stitch from right side of creeper as shown in below picture. First line of chain stitch is worked with brown color with single strand, shade no 357. Second line of chain stitch is worked with 2 strands of thread, shade no 281 ( green ). With shade no 281 upper part of creeper curve  ( whole circle ) is worked using chain stitch. 


Creeper

                  Third line of chain stitch is worked with 2 strands of thread, shade no 267. Each line of chain stitch is worked very closely.

Creeper

                Fourth line of chain stitch is worked with 2 strands of thread, shade no 262. Observe below two pictures, fourth line of chain stitch, i stopped working fourth line of chain stitch at certain point as creeper tapers. Below two pictures shows where to stop and start again.


Creeper 
Creeper

                   Fifth line is worked with 2 strands of thread, shade no 393. Fifth line of chain stitch starts from left side of creeper.


Creeper

                Work two lines of chain stitch to the left side of creeper with shade no 393 as shown in below picture.

Creeper

            Work empty center area, left side area is filled with shade no 393 and right side area with shade no 262. Same way upper part of creeper also worked.


Creeper

                 Stem of Tulip is worked with 'stem stitch'. Start from center of tulip stem, center portion is worked with 2 strands of thread, shade no 355. Two lines of stem stitch is worked with shade no 355. Next with 2 strands of thread, shade no 358 work stem stitch on either side of first two stem stitch ( worked with shade no 355 ). Lastly with 2 strands of thread, shade no 380 work stem stitch on either side of previous stem stitch. If you want a little bit more broader tulip stem, then work one more stem stitch with shade no 380.
               

Tulip Stem

                 Next post we shall add finishing touch, final touch..... keep watching .

Oct 11, 2014

GBCW........ Grapes


                    Hi, we are almost getting there..... previous posts we worked on worked ' Butterfly 1 and 2, flower Tulip '. Now to move on, lets start working Grapes.

                     Grapes, each grape is worked with ' Ribbed spider web stitch and satin stitch '. Have a look at below picture, First mark guidelines to work ribbed spider web stitch. In each Grape, keep satin stitch area more than ribbed spider web stitch.

               ' Ribbed Spider Web stitch '  is worked with 3 strands of thread, shade no 873. 


Ribbed Spider web stitch

                      While working ribbed spider stitch, (whipping vertical lines ) always start from left side and end at right side for each line. After ending at right side don't start working next line from right to left because whipping will defer.
                   
Ribbed Spider web stitch

               To start working satin stitch, first outline outer area with stem stitch with 3 strands of thread, shade no 871 ( as shown in below picture ).


Satin stitch

               Now work satin stitch over stem stitch which gives raised effect. Both stem stitch and satin stitch is worked with 3 strands of thread, shade no 871. Once grapes done, outline each grape with stem stitch with 3 strands of thread, shade no 873.


Grapes
                           
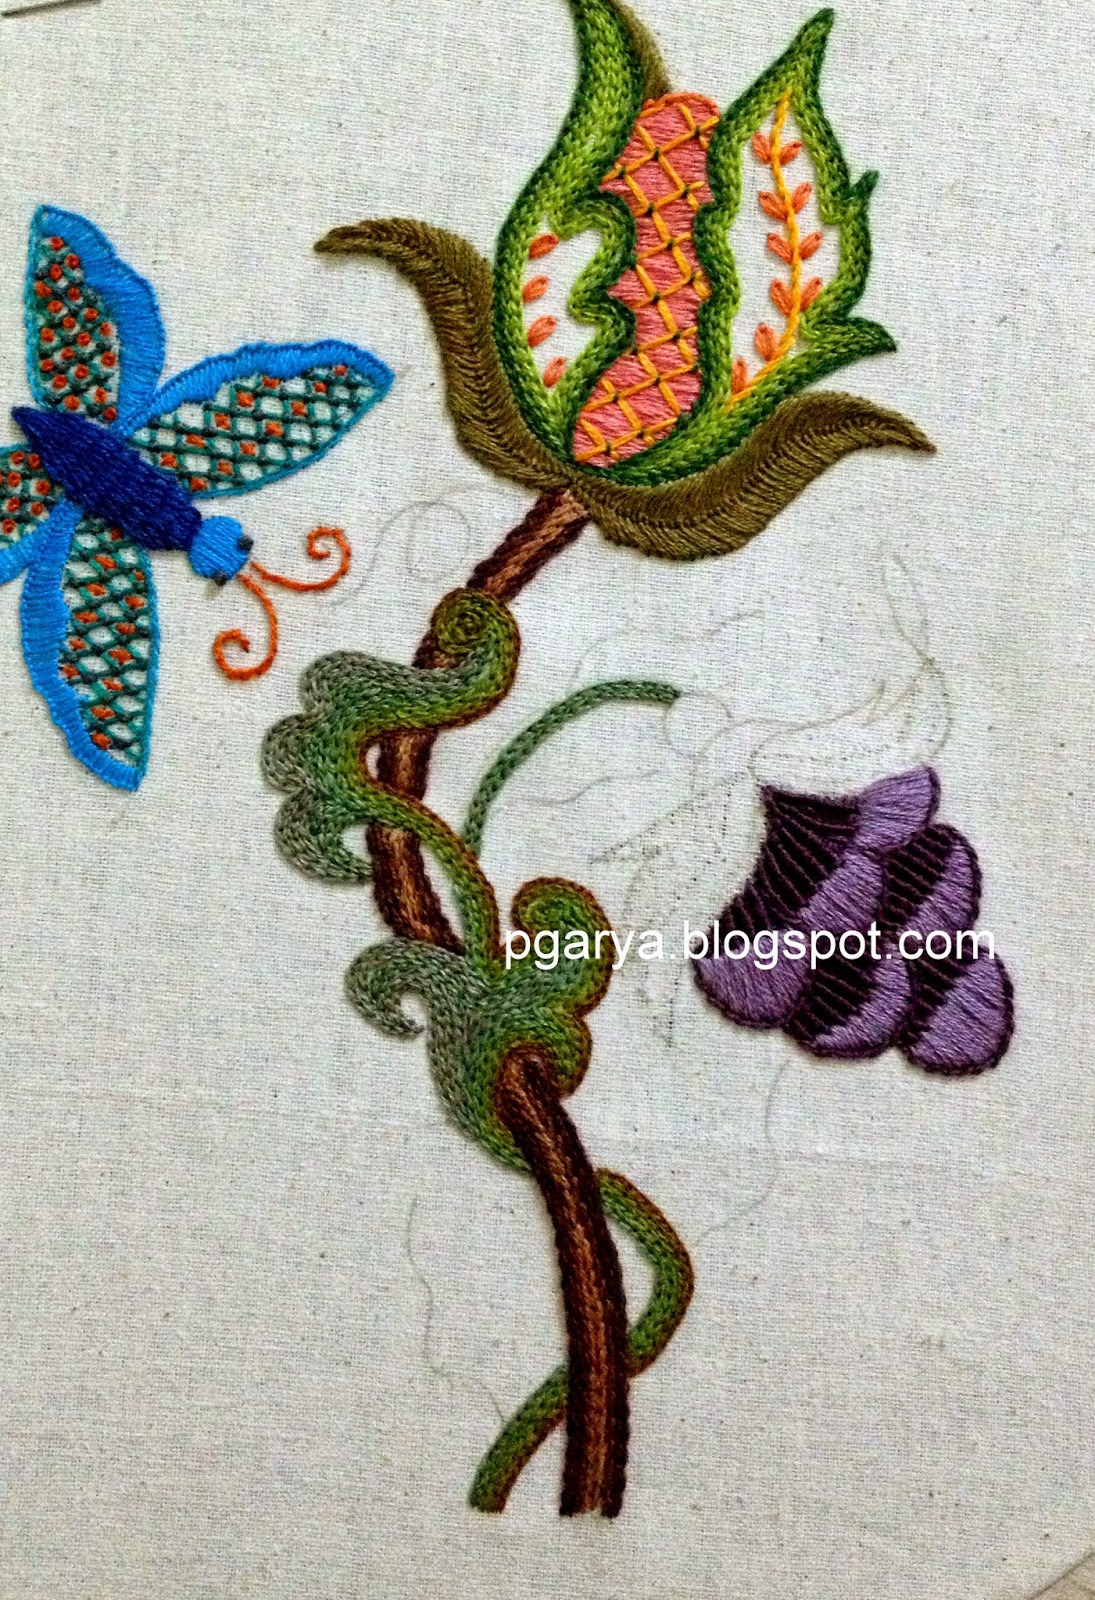
                       Have a look at finished Grapes


Grapes & Butterfly Crewel Work

                                Moving on to Grapes leaf, we shall work ' Triangle Filling '.  Observe below picture, its just two diagonal lines and one horizontal line at each center of diamond, one straight stitch to hold all lines together at two diagonal lines intersecting point and also one horizontal line.


Triangle Filling

              Add guidelines, diagonal lines to work Triangle filling. Space between one diagonal line to another is 0.5 mm, half a centimeter.  First diagonal line worked with 3 strands of thread, shade no 889.

Triangle Filling

                 Second diagonal line is worked with 3 strands of thread, shade no 267.


Leaf filling

         Now the final one horizontal line is worked with 3 strands, shade no 307.  While working horizontal line pass needle under threads ( diagonal lines ) as shown in below picture.


Leaf filling

                       Now work straight stitch with 2 strands of thread, shade no 269, at each intersecting point.


Triangle filling

                Outline leaf with ' chain stitch ' and small overlap area is worked with ' herringbone stitch ' (right leaf) with 2 strands of thread, shade no 269.


Grapes


             Next post we shall work creeper. Happy stitching !!!!


Oct 6, 2014

GBCW.....Tulip


                        Last two post GBCW 1 and  2 , we worked on Butterfly. Now we shall work upper flower which i call ' Tulip '.

                   To work two lower leaf of tulip, first add guidelines at the center of  leaf as shown in below picture. Start working ' fly stitch '  with 3 strands of thread and shade no 889 ( olive green )


Add guidelines to leaf

Fly stitch 

Fly stitch

                  Lets concentrate on center portion of tulip, work ' satin stitch '  horizontally with 3 strands of thread, shade no 10 (peach color).

Tulip, satin stitch

                Now work ' chain stitch ' on outer part of leaf covering center bud with 2 strands of thread, shade no 246 ( dark green ).

Tulip covering leaf, chain stitch

                     Now again work second line of ' chain stitch ' around outer part of leaf with 2 strands of thread, shade no 267.


Second line of chain stitch 
           
                 Once again work third line of chain stitch around outer part of leaf with 2 strands of thread shade no 256 ( light green). So first line will be dark green, second line is medium green and third line is light green. Same way finish inner part of leaf, work three lines of chain stitch with three tones of green.


Third line of chain stitch

                 Have look at below picture, working of all three lines of chain stitch.


Tulip leaf

                      Work ' stem stitch ' to mark center vine of leaf with 3 strands of thread , shade no 304. Work ' Detached chain ' on either sides of vine and also on left leaf with 3 strands of thread, shade no 329.


Highlight tulip

Tulip
                 
                    Work ' Laid work ' for bud. Over satin stitch add diagonal lines as shown in below picture with 3 strands of thread, shade no 304. Also work ' satin stitch ' diagonally on left leaf ( which shows inner portion of leaf, tiny area ) with 3 strands of thread, shade no 889. Its a very small area, satin stitch is worked diagonally inwards direction.


Laid work on bud

                   Again work diagonal lines in opposite direction on bud as shown in below picture.    Work ' straight stitch ' at intersection of two diagonal lines with 2 strands of thread, shade no 246.


Laid work 
                 
                       Finish top of bud by working ' stem stitch ' with 2 strands of thread, shade no 329.


Finishing Tulip

                         Have a look at finished Tulip.


Tulip 

                      Keep stitching. Next post, we shall deal with Grapes.  

Popular Post